Google Fonts offer 809 free and open source font families to help you better design any project. Google allows you to test your content with your selected font and to easily embed it into your project.
In this article, we walk you through selecting a Google Font, adding it to your WordPress website and styling it.
There are a couple of different methods to embed your font. Use a plugin like “WP Google Fonts” but for optimal performance we recommend embedding the link into the <head> of your document. Read on to learn how!
1. Selecting your Google Fonts
First, let’s select a font-family you like. Google Fonts provides you with the option to select between 5 different typefaces which are Serif, Sans-Serif, Display, Handwriting and Monospace.
The Difference Between Typefaces:
Serif fonts are defined by the small feet tailing from the letters or symbols.
Sans-serif literally meaning without ‘serif’ – characters do not have small feet at the end of each stroke.
Display type refers to the use of type at large sizes and are considered useful at display sizes (30px and above).
Handwritten fonts are usually used for design purposes at they attract the eye and stand out more in comparison to other typefaces.
Note: Shouldn’t be used for paragraphs as it is difficult to read.
Monospace fonts are characters that occupy the same amount of space horizontally.
2. Embedding Google Fonts into WordPress
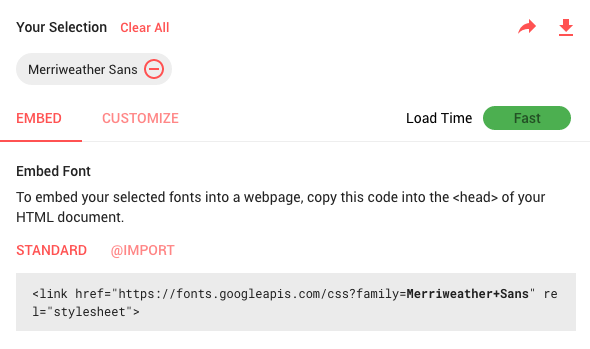
To embed your selected fonts into a WordPress site, copy the code provided in ‘Your Selection’ under the “Standard” option.

Your link will look something like this:
<link href=”https://fonts.googleapis.com/css?family=Merriweather+Sans” rel=”stylesheet”>
You’ll want to link to the font family in the head of your document. Usually, in WordPress it’ll be in your header.php file (dependent on your theme). Login to wp-admin and in the dashboard of your WordPress site under Appearance > click Editor.

<head>
/*–paste link here–*/
<link href=”https://fonts.googleapis.com/css?family=Merriweather+Sans” rel=”stylesheet”>
< /head>
Tip: The hierarchy of your links matter so make sure you paste this at the very bottom (if you have other links) but still within the section.
3. Styling with your Google Font
Now navigate to your stylesheet and copy and paste the code from Google Fonts for your styles into your stylesheet.

Depending on what you want to use the specific font for, set your font-family for that specific property.
For example:
h1 {
font-family:’Kaushan Script’, cursive;
font-size:30px;
}p {
font-family:’Merriweather’, serif;
/*–Serif Font–*/
}
Which will result in:
This is my H1 in the typeface of Handwriting, font-family Kaushan Script
This is my paragraph text in the typeface Serif, font-family Merriweather.
And just like that, you’ll have your font from Google embedded into your WordPress website!
What’s your favorite font-family on Google Fonts? Tweet us at @intuitionnet and let us know.
Thanks for reading!
Suggested Links:
- Selecting a Quality WordPress Theme
- 7 Easy SEO Tips that’ll Help you Rank in Google
- Managed WordPress Hosting vs. Hosting


